Want to Take Your Own Real Estate Listing Photos? Here’s How to Do It Right... and Wrong


Okay... I'm a real estate photographer.
After writing this blog, bouncing it off ChatGPT (yep, the photos are 100% ChatGPT), and then coming back to read it again after a short break, I realized something: it definitely reads like a real estate photographer trying to convince you to hire a professional real estate photographer instead of taking your listing photos yourself.
Fair enough. I probably am.
But here's the deal. If you read all the way to the end, and no, there are no special algorithm points for doing that, you'll also get the tips you need to take better listing photos yourself, whether you're using a smartphone or another camera.
So yes, I'd love for you to hire a professional photographer. But if you're going to photograph the house yourself, I'd also like to help you do it well.
Modern smartphones have incredible cameras. Even an entry-level mirrorless camera can produce photographs that would have required expensive professional equipment not that many years ago.
So, if you're preparing to sell a home, you might reasonably ask:
Why not take the listing photos myself?
You can. But owning a good camera and creating good real estate photography are two very different things. It is entirely possible to take a terrible real estate photograph with a very expensive, state-of-the-art mirrorless camera. Trust me, the camera will happily let you do it.
Real estate photography presents some unusual challenges. You may have very bright windows sitting next to dark interiors, small rooms that are difficult to photograph naturally, several different types of lighting in the same room, vertical lines that quickly become distorted, and the constant challenge of making a property look its best without making it look like something it isn't.
To give smartphones their due, modern phone cameras are remarkably good at handling some of these problems. Using computational photography and multi-frame HDR, a smartphone can combine information from several exposures to preserve the view through a bright window while still showing detail inside the room. Much of this happens automatically, and the results can be surprisingly good.
But that convenience comes with tradeoffs. Smartphone images can sometimes look heavily processed or overly sharpened, and their small sensors naturally produce a great deal of depth of field, meaning almost everything from foreground to background tends to be in focus. They also offer less control over perspective, lens choice, lighting and how the viewer's eye is directed through the photograph.
A professional camera doesn't automatically create a better photograph. It simply gives the photographer more control. Knowing what to do with that control is where professional real estate photography begins.
If you want to photograph your own listing, here are some of the things you'll want to get right.
Start Before You Pick Up the Camera

One of the biggest improvements you can make to listing photography doesn't involve the camera at all.
Prepare the property first.
If you are an Agent reader, skip past this part... you are likely very familiar with pre-listing house prep and listing photography readiness.
Remove unnecessary items from countertops. Hide trash cans when practical. Put away hoses, cleaning supplies, toiletries, pet bowls, and other distractions. Close toilet lids. Turn televisions off. Make beds and straighten pillows and bedding.
Outside, move vehicles away from the front of the house whenever possible. Garbage cans, garden hoses, children's toys, lawn equipment, and other temporary objects should also be moved out of sight.
Ceiling fans deserve special attention. Turn them off before photographing a room. A moving fan can appear as a distracting blur, particularly when using the longer exposures often required for interiors.
Blinds and curtains should also be handled consistently. If there is an attractive view, you may want to feature it. If the view is primarily a neighboring wall, parked car, or other distraction, a different treatment may work better.
The objective isn't to make the house look empty. It's to remove distractions so the viewer notices the property rather than the stuff inside it.
Choose the Right Time to Photograph

Photography is fundamentally about light, and the time you photograph a property can make an enormous difference.
For exterior photographs, consider where the sun will be relative to the front of the house. A beautiful property photographed with the front completely in shadow can look surprisingly flat and uninviting.
Midday isn't automatically best, either. Strong overhead sunlight can create deep shadows beneath rooflines and trees while producing very bright highlights elsewhere.
For interiors, daylight is generally desirable, but bright Florida sunshine introduces another problem: the difference between the brightness outside the windows and the brightness inside the room can be enormous.
Your eyes compensate for that difference remarkably well. Your camera doesn't.
That brings us to one of the biggest challenges in real estate photography.
One Photograph Often Isn't Enough

Walk into a living room on a sunny afternoon and you can probably see the furniture clearly while simultaneously seeing the trees, pool, or backyard through the windows.
Take one photograph of that same room and you may discover something very different.
Expose for the room and the windows can become almost completely white.
Expose for the windows and the room may become extremely dark.
Professional real estate photographers have several techniques for dealing with this. One of the most common is exposure bracketing, often combined into an HDR image.
Instead of taking one photograph, the camera takes several photographs from exactly the same position at different exposure levels. A darker exposure preserves information in the windows and highlights, while progressively brighter exposures capture information in the shadows and interior.
Those exposures can then be blended during editing to create an image that more closely resembles what you perceived when standing in the room. Time... editing requires time, the number one commodity.
The key word, however, is naturally.
Overprocessed HDR can make a room look artificial. Good real estate editing should reveal the property, not announce the editing technique.
Camera Height Matters More Than You Think

A common mistake is simply holding the camera at eye level. For many interiors, that's too high. A useful starting point is approximately chest height, although the ideal camera position depends on the room and what you're trying to show. Kitchens typically require the camera to be slightly higher to not show the bare underside of kitchen cabinets.
The objective is to create a balanced view of the room without showing an excessive amount of either the ceiling or the floor.
The single most important consideration: Keep the camera level.
Tilting the camera upward or downward causes vertical architectural lines, walls, doorways, cabinets and windows, to begin converging.
Instead of walls appearing straight and vertical, the room can start looking as though it's leaning backward or falling toward the viewer.
Some perspective problems can be corrected in editing, but getting the camera position right when you take the photograph produces a much better starting point.
Don't Automatically Use the Widest Lens You Have

This is one of the easiest mistakes to make.
Real estate photography often requires a wide-angle lens, particularly in bathrooms, small bedrooms, hallways, and other confined spaces.
But wider isn't always better.
An extremely wide lens can make a modest bedroom appear enormous. Objects close to the camera become disproportionately large while objects farther away appear unusually small.
At first, that might sound like a good marketing strategy. It isn't necessarily.
The purpose of listing photography isn't to trick someone into believing a 10-by-11-foot bedroom is a massive suite. If the photographs create unrealistic expectations, buyers may be disappointed when they actually visit the property.
Whenever space permits, I prefer a more natural perspective and reserve extremely wide views for situations where they're genuinely necessary.
Your goal should be:
Make the room look as good as it really is, not larger than it really is.
Composition Should Explain the Property
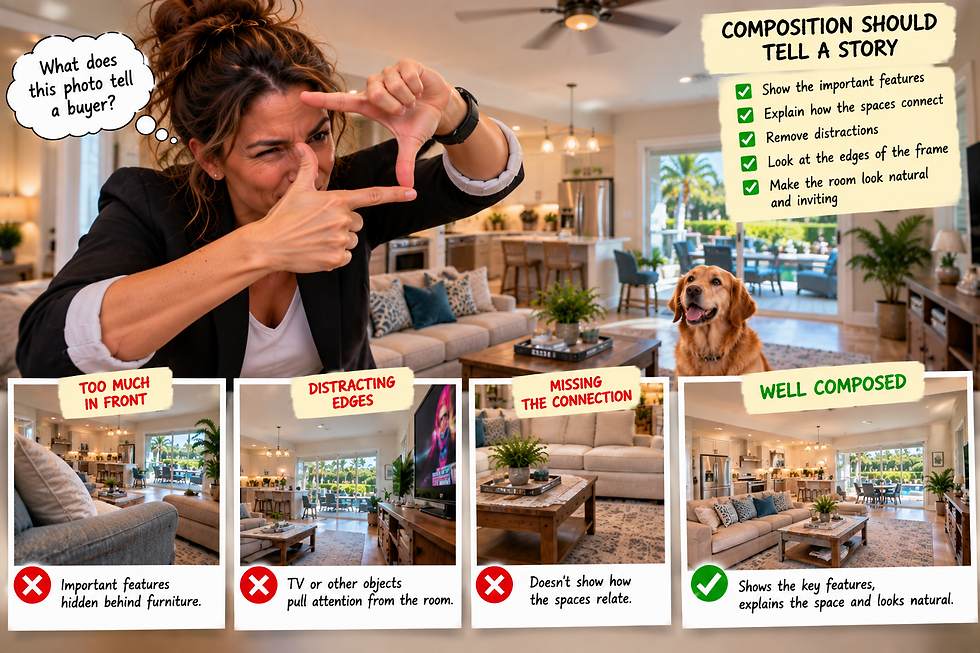
A listing photograph isn't simply supposed to be attractive.
It should communicate information.
Before pressing the shutter, ask yourself what the photograph tells a prospective buyer.
Can they understand how the kitchen relates to the living room? Can they see the entrance to the primary bathroom? Does the photograph show the feature that makes this room interesting? Are you photographing an important architectural feature, or accidentally hiding it behind a chair?
Corners can provide useful perspectives, but don't automatically stand in the corner of every room.
Move around.
Sometimes shifting two feet to one side completely changes the photograph.
Look at the edges of your frame as carefully as the center. Half a chair, the edge of a television, an open closet door, or a sliver of an adjacent room can become surprisingly distracting once you're looking at the finished photograph.
Pay Attention to Interior Lighting

Interior lighting is more complicated than simply turning every light in the house on.
Different light sources can have dramatically different color temperatures. Daylight coming through a window may appear relatively cool while incandescent or warm LED fixtures appear yellow or orange.
Mix enough different light sources together and walls that are actually white can appear blue in one area and yellow in another.
Sometimes turning on a room's lights improves the photograph. Sometimes natural window light produces the cleaner result.
The important thing is to make the decision intentionally rather than automatically flipping every switch in the house.
And whatever approach you choose, try to maintain consistency as you move from room to room.
Don't Forget the Exterior

For many buyers, the exterior photograph is their first introduction to the property.
It deserves more than walking to the curb and taking a quick picture.
Keep the camera level. Watch the position of the sun. Look for distracting vehicles, garbage cans, hoses, signs and neighboring objects. Consider photographing from several positions rather than assuming that straight-on is automatically the strongest composition.
Also look beyond the house itself.
Does the property have a pool? Large backyard? Workshop? Waterfront? Corner lot? Mature landscaping? Interesting driveway or entrance?
Those features are part of the story you're trying to tell.
What About Drone Photography?

Aerial photography can provide information that ground photography simply can't.
It can show the relationship between the home and the property, demonstrate the size and shape of a lot, reveal nearby amenities, illustrate proximity to water or other features, and provide a perspective buyers can't get standing in the driveway.
But there's an important distinction when drones are being used for real estate marketing.
If you're flying a drone as part of a commercial real estate photography operation in the United States, you're operating under FAA rules governing non-recreational drone operations. That generally means the pilot needs to hold an FAA Remote Pilot Certificate under Part 107 and comply with the applicable operating and airspace requirements.
There may also be controlled airspace, temporary flight restrictions, operations over people or moving vehicles, or other circumstances that affect whether and how a particular flight can legally be conducted.
In other words, aerial real estate photography, especially in 2026, isn't simply a matter of owning a drone.
And Then There's Editing

Once you've photographed the property, you're only halfway finished.
Professional real estate photography typically involves selecting the strongest compositions, blending exposures where appropriate, correcting perspective and lens distortion, balancing color, controlling highlights and shadows, and preparing the finished images for their intended use.
Editing should improve the photograph without materially changing the property.
That's an important distinction.
There's a difference between correcting the color of a wall and changing its color. There's a difference between properly exposing a lawn and replacing it with something that wasn't there.
The finished photographs should be polished, attractive and professional but they should still represent the property a buyer will actually see.
So, Should You Take Your Own Listing Photos?

Absolutely, if you have the time and you're willing to put some effort into it.
Modern cameras and smartphones are remarkably capable, and understanding a few basic principles of composition, lighting and exposure can dramatically improve your results.
But there's also a reason professional real estate photography is a specialized service.
The camera is only one part of the process.
It's knowing where to put it. Knowing which lens to use. Recognizing difficult lighting before taking the photograph. Knowing when multiple exposures are necessary. Keeping architectural lines straight. Understanding how to make a small room attractive without making it deceptive. Knowing what to remove from the scene and what should remain. And then turning all of those individual photographs into a consistent visual presentation of the property.
If all of that sounds manageable, give it a try.
If you'd rather spend your time selling the property instead of photographing it, that's where a professional real estate photographer comes in.


Comments